There are two ways you can add custom emails to the Mac Mail App: Manually or Automatically using a Configurations Profile (Actually a semi-automated method).
In this quick tutorial, I teach you how to Add an Email Account to Mac App using the Manual Method.
If you prefer an alternative method: Click Here to learn how to add emails to Mac Using a Mail Configurations Profile.
Add Email Account to Mac Mail - Manual Method
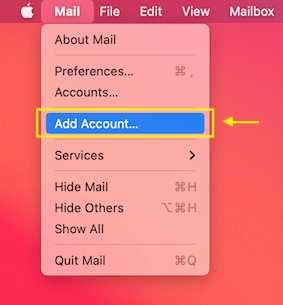
Step 1: Launch the Mail App, then "Add Account"
Launch the built-in Mail App, and Click “Mail” -> “Add Account” from the top Menu.
If you don’t have the app, you can download it from the Mac App Store.
Step 2: Choose Account Type
Select “Other Mail Account” from the Mail Account Provider popup.

Step 3: Add Your Email Account
A new window will pop up. Enter your name, email address, and password for the email account you want to add.
The password will be the same password you choose while creating the email account on the server.
Then Click “Sign In”

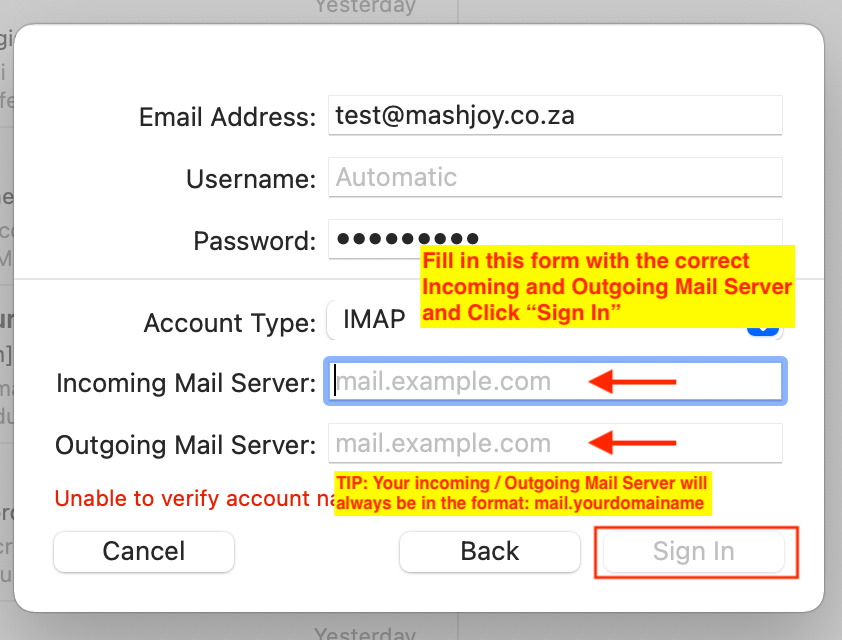
Step 4: Add Additional Account Information
At this stage, the Mac Mail App will try to detect the email provider automatically.
If it is successful, it will fill in the rest of the fields for you. If not, you can manually enter the information. If you are unsure about your mail configuration settings, here’s how you find them on cPanel:
Connecting Emails to your Laptop/PC, Phone & Tablet
Once you have created your new email account. You will need to connect them to your other devices.
The steps are very simple. You simply copy & paste or download the email setup instructions and use them in the email setup stages of your device.
✅ Here’s how to do it:
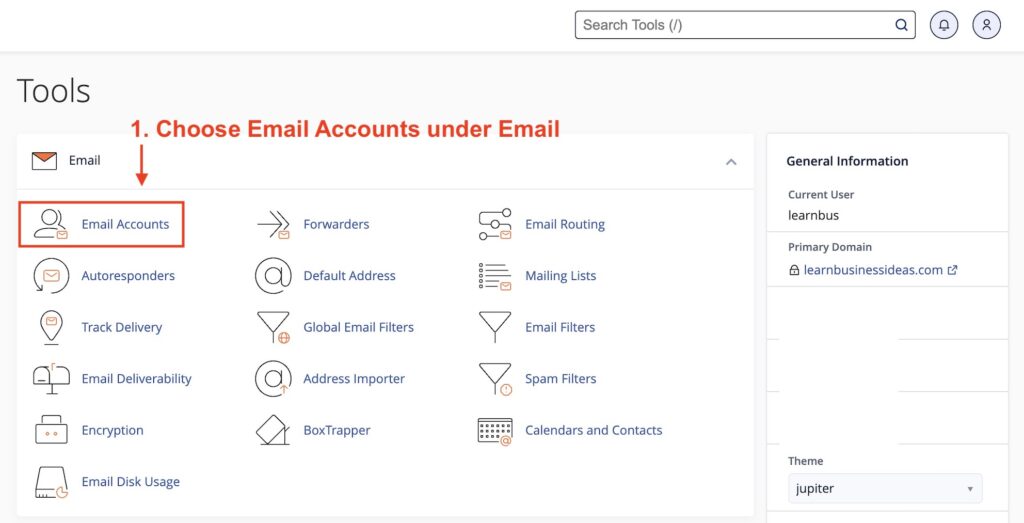
Step 1: Login to cPanel
First, log into your cPanel account and click on the “Email Accounts” icon.
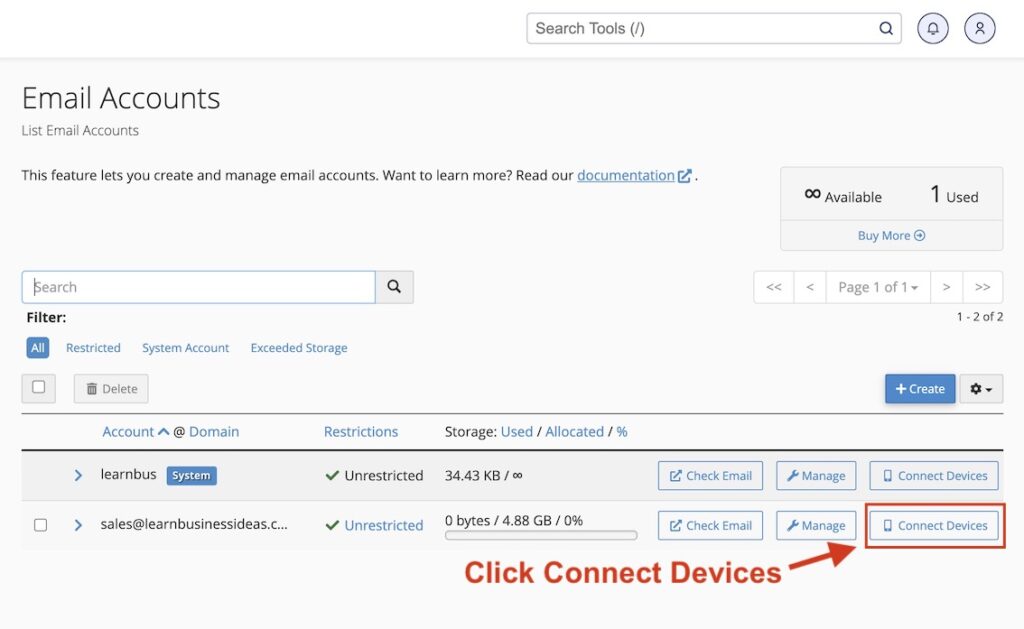
Step 2: Choose Email Account
Find the email account you want to connect and click on the “Connect Devices” button next to it.
Step 3: Get Your Configuration Settings
A new window will open with the email setup instructions. Copy or download these instructions for use in the setup stages of your device.
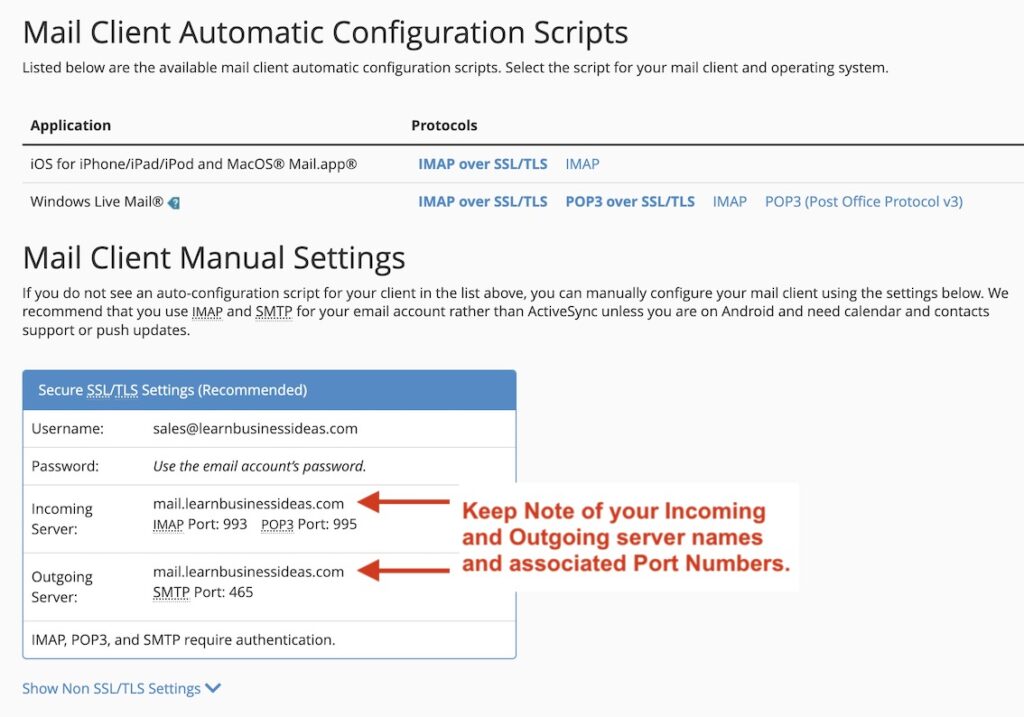
The information you need here is what’s under Mail Client Manual Settings.
Any email App or software you are going to use will always ask for what’s on this type of screenshot.
If you are setting up multiple email accounts, 💡there is a way to easily remember these settings.
- Username – basically your email address.
- Password – The password you’ve set up for that email address.
- Incoming Server – The Incoming Server name will be the same for all email accounts in that specific domain name. It is always mail.yourdomainname.com or just add the prefix “mail.” then your domain name – (mail dot your domain name).
- Incoming Server Port Numbers – When setting up emails on any device, you will always be asked if you use IMAP or POP. Whichever you choose, Just keep in mind the IMAP Port number is 993 and POP3 is 995.
- 🙋🏽♂️ IMAP or POP3 – If you are unsure about the difference between IMAP and POP3, I’d recommend you just choose IMAP. IMAP behaves like any other email (@gmail, iCloud, @yahoo, etc.) and automatically syncs across all your devices and server in real-time. POP3 on the other side has its own pros and cons and may confuse some people, read here to understand the actual difference between IMAP & POP3.
- Outgoing Server – Works the same as incoming server. The only difference is the port numbers.
- Outgoing Server Port Numbers – Will be the same for all email accounts in that specific domain name. The Outgoing SMTP Port is always: 465 for IMAP and POP3.
To avoid coming back to cPanel over and over again just for email account settings.
You can also download the copy email setup instructions to your existing email for ease of reference.

Device Instructions
The last step is to now use the instructions you copied or downloaded from your cPanel account to fill in the rest of the setup information, such as the incoming and outgoing server names and port numbers.
Depending on your device, go to settings, find email setup options, and follow the instructions to add a new email account.
Here are the email setup instructions for the most popular devices and mail client apps:👇🏽
Connect Emails to Laptop, PC and Mac Devices
Connect Emails to Smartphone & Tablet Devices
- How to Connect Emails to Android Phone / Tablet
- How to Connect Emails to iPhone and iPad
Once you have filled in the correct Incoming and Outgoing Mail Servers information. Click “Sign In”
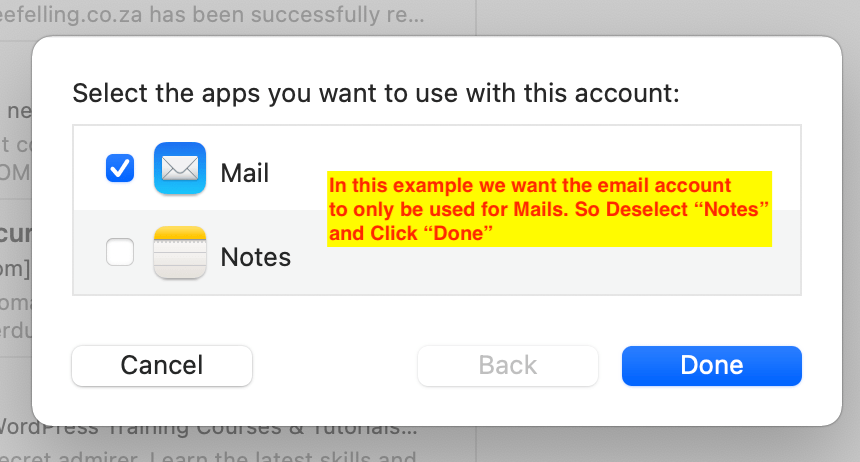
Step 5: Step Before Last - Choose How You Are going to use your Account.
Choose which Apps you’d like to use the email for, in this example, we only need to use the email account just for Mails,
So select/deselect any other app as per your preference.
After clicking “Done” Your email account is now added to Mac Mail App. You can repeat these steps to add more email accounts.
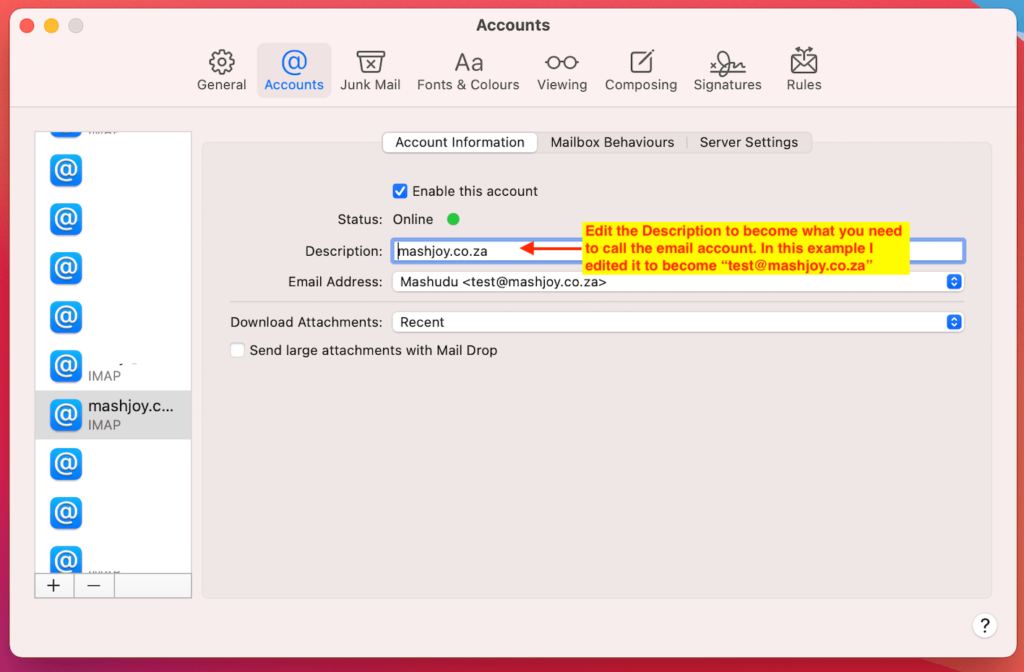
Step 6: Modify The Name of Your Email Account (Optional)
Step 6.1: If you’re using Mac Mail App to manage multiple email accounts, you might want to give your newly added account a name so you can easily identify it from a list.
By default, Mac Mail App will just call your newly added email account yourdomain.com, which isn’t very helpful for identification.
Personally, I like to name my email accounts by their actual email address (e.g. john@domainname.com). Here’s how you can change the name of your email account:
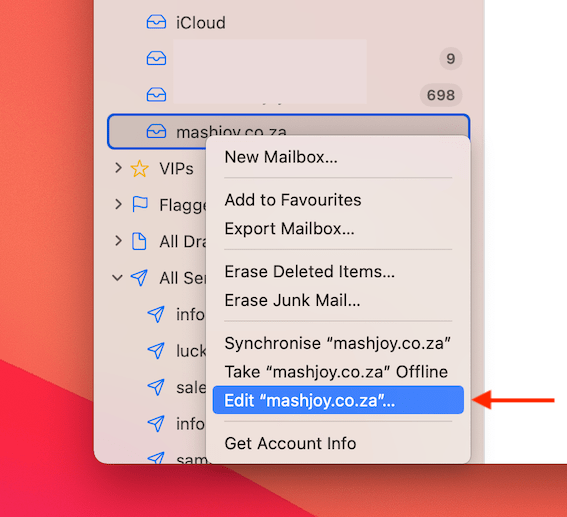
Step 6.2: Edit the name in the “Description” part to become the desired name for the email account and close the popup.
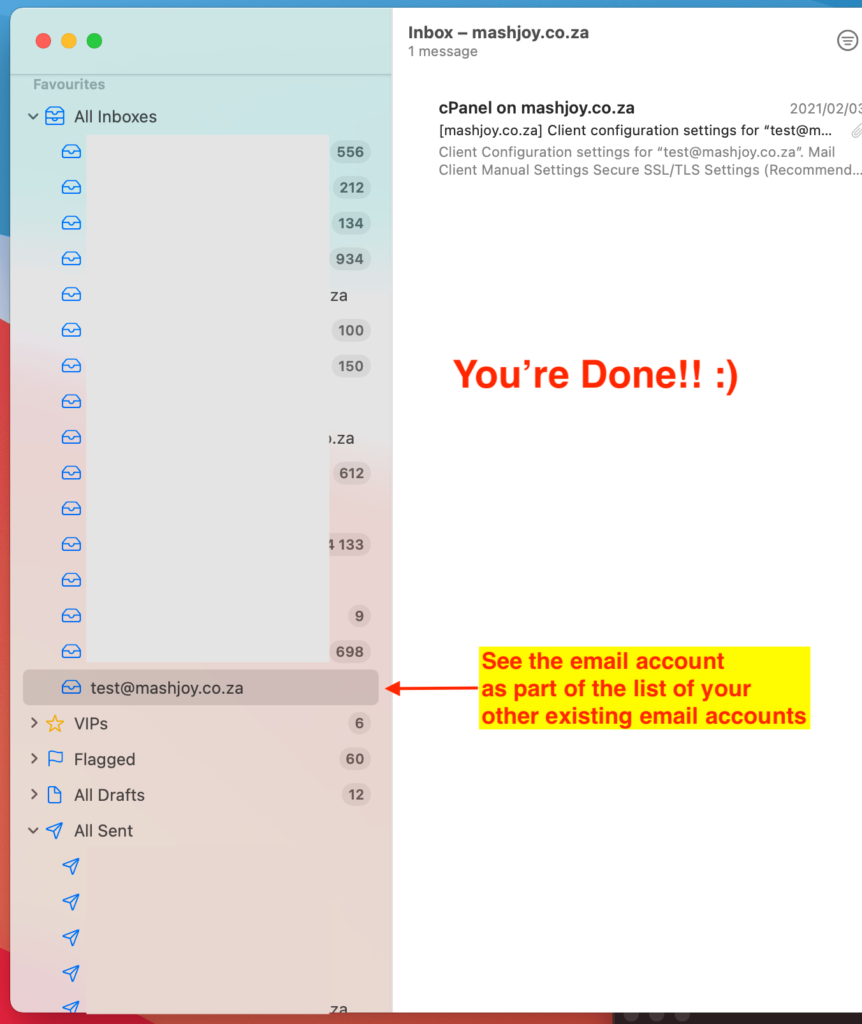
Step 6.3: You’re Done!! Begin using the email account 🙂
End of Tutorial
Congratulations! You have successfully added an email account to Mac Mail App.
With this app, you can manage all your email accounts in one place and save time logging in and out of different accounts.
If you have any questions or encounter any issues during the process, don’t hesitate to ask for help.