Before Starting a Professional Blog
The first thing you need to do is understand what it means to have a professional business blog that earns money, and why it matters.
So let’s make it clear: a Professional Business Blog is not just another website where you write about your passion, your business and spam people with Ads or affiliate products/services.
But rather it’s an online platform for answering to people’s questions on Google or the internet. A blog is what you use to earn trust and engagement from your audience based on the quality of information you provide and then recommend relevant products and services to earn sales.
If you’re keen to start a blog, I recommend that you create a clear strategy first. How much money do you really need to make through your blog? If a Million/month Dollars or Pounds, then how much content content should you be producing a day/week to meet those targets?
Where will your target audience be found, what problems do they have today that I can help them solve? Which topics will I post about and are there ways I can monetize my content around those topics?
These are just some of the questions that you should be able to answer before getting started.


- Buy hosting and register a new domain
- Install WordPress
- Install a new blogging theme based on your niche
- Customize your blogging theme
- Start Blogging
- Or do it all for free with Wix (Wix is still great btw 😊)
But in actual reality. blogs that earn a consistent lifetime income are not just simple blogs. They are professional business blogs built with the right tools and methods from the start.
- Do all the steps on to start a simple blog, And make sure you:
- Choose the Perfect Web Hosting Platform for WordPress Blog,
- Choose the Perfect WordPress Theme for your blog,
- Use the Best WordPress Plugins for your Blog type,
- Know How To Use WordPress (It takes about 5 hours to learn how to use WordPress) – Link to WordPress courses,
- Understand how SEO and getting organic traffic on Google actually works,
- Have a proper business plan for your blog from the start,
- Know the different ways you can earn money with a blog,
- Know the Best AI tools you can use to produce content for your blog,
- Know the best productive tools for bloggers (MAC, Windows),
- Know the best courses for bloggers on Blog Monetization,
- Know the best affiliate programs you can join,
- Know the best Ads programs you can join, besides Google Ads,
- Pick the best Blogging Podcasts you can listen to,
- Know the best Blogging Influencers you can look up to and learn from,
- Most Importantly: Be develop habits to stay consistent in producing new content,
- ….
As you can see, the list of things to do when starting a profitable blog can be overwhelming at first. So doing all the right things to a business blog can take a while.
Also, you should be prepared to spend some money in order to get all the correct resources in place.
If you are are just bootstrapping on a shoestring budget. Don’t worry, this guide is still for someone like you. I breakdown all the proper steps you should follow how to start a blog even on a low budget.
7 Steps on How to Start A Business Blog
Creating a successful blog is easier said than done, but if you follow these steps, I can guarantee it’ll be worth your time and effort.
- Web Hosting and and domain, registration – About $3/month or $60/upfront),
- A Good WordPress Theme,
- Only the Right Plugins for your blog,
- About 5-8 Hours of your Time,
Step 1: Register for Web Hosting and Domain
Choose one of the web hosting platforms and register a domain and web hosting. A domain is basically your websitename.com part of your blog, and web hosting is a server that will host your website data and emails. So the two always work together.
Since you’re going to build your blog using WordPress. I recommend you host your blog on a WordPress Hosting package or a Shared Hosting package.
WordPress hosting and Shared Hosting are two different things. While they both do the same thing, they do it in very different ways:
WordPress hosting is a type of hosting that is specifically designed to support WordPress-based websites.
Shared hosting, on the other hand, is a type of web hosting that’s generally cheaper than WordPress hosting but requires a little bit of a manual steps to install and configure WordPress than on WordPress-specific hosting package.
Choosing between the two should just be a cost preference.
For this tutorial, I recommend using BlueHost, NameHero or NameCheap for web hosting.
Reason being, these web hosts provide fast, secured and reliable cloud web hosting that is affordable. You will also get an exclusive signup discount from the get go!
If you choose NameHero, Here is how registering a domain and hosting will look like: (Show photos)
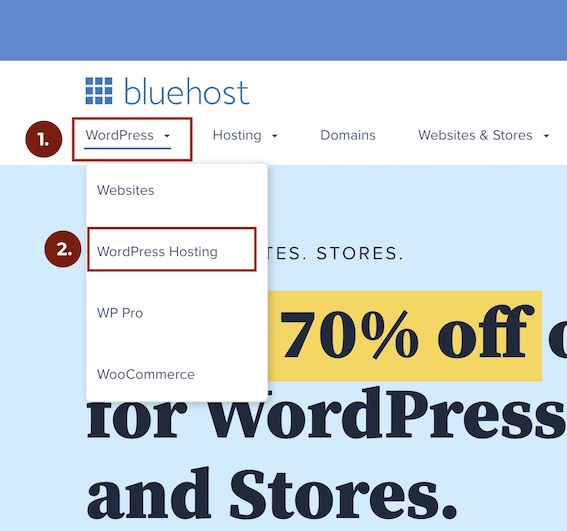
On BlueHost’s Navigation Menu. Go to WordPress -> WordPress Hosting.

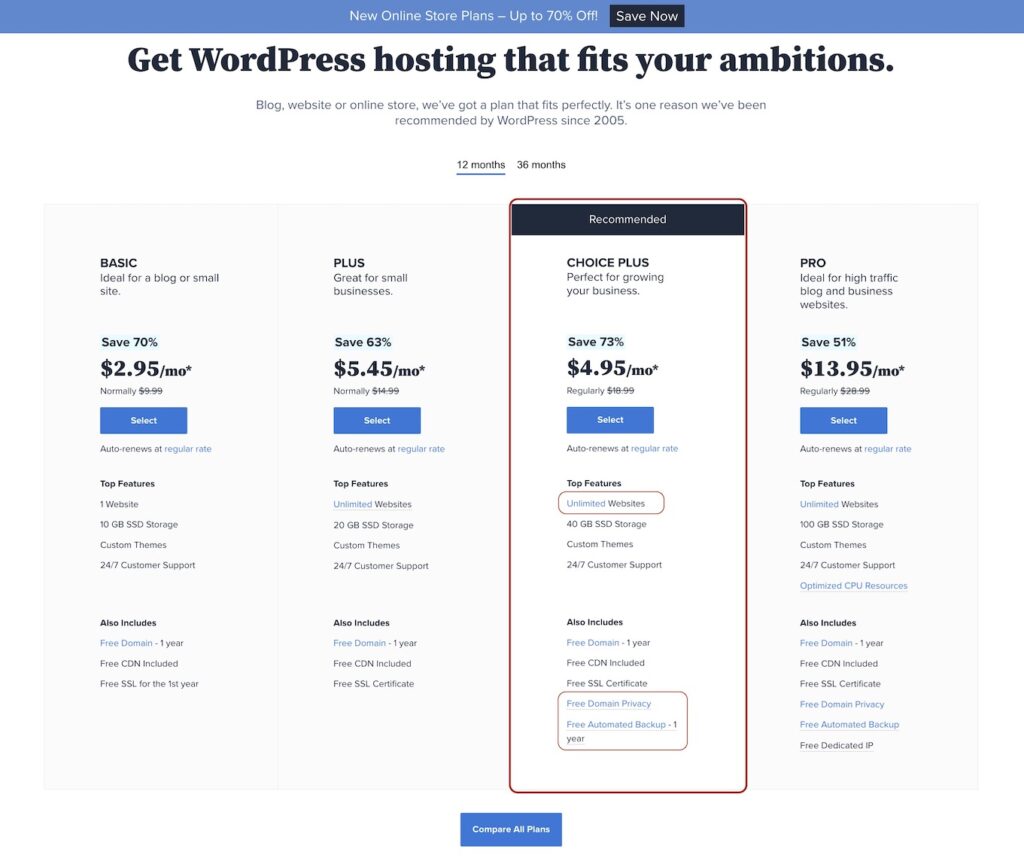
Scroll Down to the middle of a page to find the WordPress plans you can sign up for. I recommend starting on the CHOICE PLUS package because it offers domain privacy and website backups.
The Basic Plan is also alright for a start on a low budget, but you will need to upgrade as your blog grows.

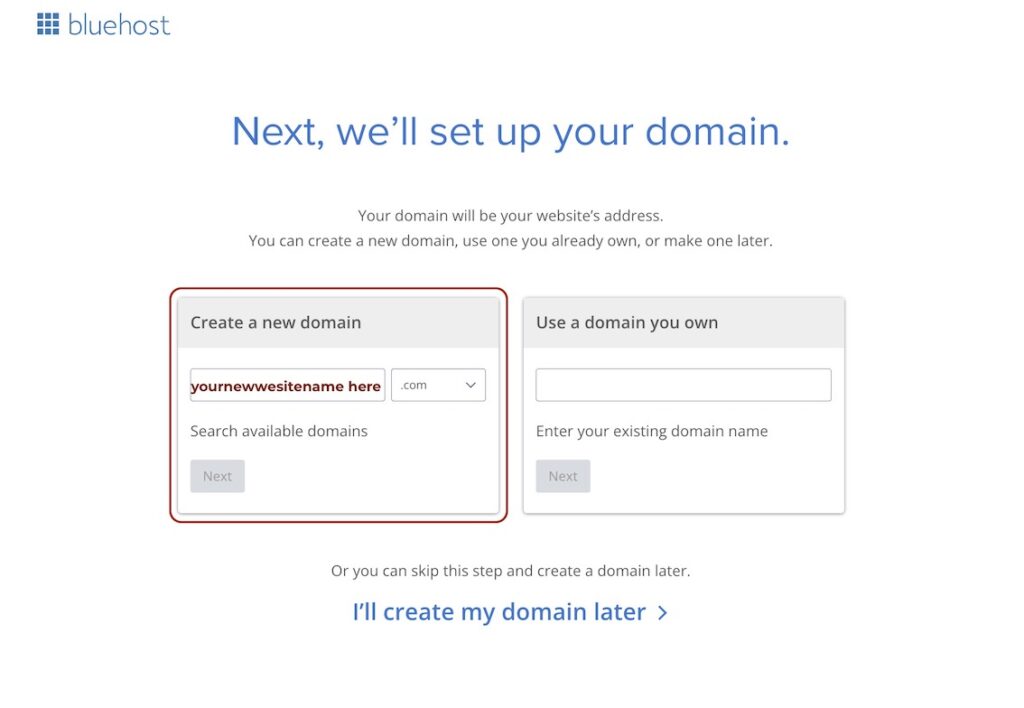
Enter your domain name you’d like to register. Click Next and Proceed to the checkout process.
If you already have a domain name registered from a different host. Like GoDaddy. You can enter it under the Use a domain you own box.

Last Step: Now that you find it easy. Let’s Get You Started
Step 2: Install WordPress
Installing WordPress is very easy. It’s just a matter of launching the WordPress App inside your server, create the login credentials for your website and Click Install. So it’s not that technical.
Depending on the web hosting provider you decided to use, Here’s how you’d go about installing WordPress:
Step 3: Install A WordPress Theme
Now that you’ve installed WordPress, You now have a website using a default WordPress theme. You can visit your website and it will look more like this: (show a photo of default new WordPress)
So you will need to install a new Theme so your website can look differently.
A theme in WordPress is like an operating system on a mobile phone. If you choose Android, then your phone will only run Android Apps.
Similarly, When you choose a theme for your blog, you need to make sure that the theme is compatible with all the plugins you will need and that you can be able to add all the features you need in your blog.
If the concept of choosing the right theme for you feels a little bit confusing, don’t worry. I have list of themes you can use without any problems:
(List the themes and short reason why I choose that theme)
In this example, I will use Astra Theme to demonstrate how to install a theme. Astra is free and highly compatible, reliable and fast. It also my theme of choice in this blog you are reading:
(Show steps to install Astra)
(Show steps to install other themes) – Articles needed!
If you struggle with installing a theme to your WordPress, Simply register for web hosting and domain through BlueHost or NameHero and 📧 send me an email so I can help you with the installation process or do it for you.
Step 4: Install the Right Plugins to Make Your Blog Work
Everything on WordPress works through a plugin. For example. If you need to have e-commerce feature on your website, you install a plugin for that. If you need to use PayPal on your website, you install a PayPal plugin.
- Elementor – Drag and Drop Page Builder.
- Astra Starter Sites – To load ready made templates on your website (show an elementor gif)
- Updrafts Plus – To create quick backups for your website
- WP SMTP – To make your emails work through any contact form
- RankMath SEO – SEO Plugin to help you make your posts rank on Google. Basically helps you prepare your posts for Google so it can be indexed on Google search. (show a gif on setting up rankmath’s meta details )
List all of them:
You might also need:
Elements Kit
Step 4: Customise your Website
Customizing a blog will take some time and a bit of a learning curve. So give this part about 2-5 hours.
As you learn how to customize a blog with WordPress and Elementor, just understand that the most important thing to master is knowing where to find settings for what.
Since this part will require a show and tell process: Here is a quick video showing you how to customize your website blog:
Once you have invested some time learning the settings of your blog, you might want to change your entire theme, rebrand from scratch. and it’s completely normal!
Personally, I still customize my blog almost everyday or once a week. The goal is to have a design that bests represents your brand.
For example. My blog provides help to business owners and online entrepreneurs. So I went for a simple, polished, minimalist look with larger text, breathable spaces.
This means I have disabled some of the features that came with my theme and only use the plugins I need. For this reason, my readers can digest information easily and be able to buy affiliate products recommended without any distractions.
Step 5: Create Your First Blog Post
Posting articles on WordPress is also very easy. It works very similar to how you’d post information on any other online platform (Google Docs, Facebook, Reddit, Medium etc.).


- Knowing how to Add headings and Text
- How to dd images/videos to your articles
- How to add links to your text
- How to add a thumbnail for your blog
- How to optimize your article to appear on Google search results
Doing any other thing to your article just comes as second nature. This will involve things like, Adding Ads to your blog, adding a list with checkboxes to your text, Adding a subscriptions form to your blog, adding a popup etc.
Here are the steps on how to post your first blog article (show a video on how to post your first article) and also steps on how to do it
Step 5: Create Your First Blog Post
Now that you’ve written an article, it’s time to make sure it can appear on Google search results.
This stage is called SEO (Search Engine Optimization) and its done through a Plugin called RankMath SEO or Yoast SEO (Here is a list of best SEO Plugins you can use – embed a link to this text)
Step 6: Add A Firewall and Brute Security to Your Blog
With hackers and internet threats everyday. It’s important to add all layers of security to your blog from the start.
Understand that securing your actual blog is just another layer of security on top of the security offered by your web host.
At this stage you’re basically doing what you can to block annoying things like spam robots that sends creepy messages through your blog’s contact forms, blocking unwanted comments, and things hackers can do to slow down your blog’s potential.
- Enable A Firewall to Your Blog – To block all known phishing attempts and unwanted access, like robots and users with IP addresses associated with malicious activity from having any access to your website. This is a crucial step!
- Enable ReCAPTCHA. – Reduce the number of email spam by adding a human verification to contact forms on your blog. This helps ensure that your site isn’t being abused by bots to spam your users or steal information from them.
What’s nice about ReCAPTCHA is that you can use Invisible ReCAPTCHA, meaning the human verification element will only show up when there is suspicion.
e.g When form is being filled too quickly than a normal human being would, it will prompt the user to verify if they are a human being before the form is processed further.
Once a user has checked and confirmed that everything on the page looks right and makes sense, they can move along through their workflow as usual—without having to stop and solve any puzzles!.
Step 7: Setup Automatic Backups to Your Blog
Backups are essential to any WordPress site. Unfortunately, they are often the first thing that gets forgotten about or put off until later.
This is a terrible idea. You need to backup your WordPress blog on a regular basis because it is the only way to protect yourself from losing everything that has taken you so long to build.
Your site can be hacked and your hard work gone in an instant. If this happens, it will be devastating! You need backups so that if this happens, you can restore your website quickly and easily.
- Through the Hosting Server – Make sure Automated Backups are running through your host host).
- Offshore backup of the website on Google Drive / Dropbox – Using a free plugin called Updrafts Plus. For in case a server backup won’t help much.
- Download the Latest Backup to your Local Computer. – Do this once every week or so.
As you can see, you need to backup your website in multiple places to mitigate the chances of loosing everything and not have options to have your website back.
Monetizing Your Blog
There are many ways you can monetize your blog. The well-known methods are Ads and Affiliate marketing.
However, since this is the business part of your business blog. I recommend learning how to do blog monetization right.
Here are some good courses you can use to learn how to properly monetize a blog:
1. Blogging for Profit by Michelle Schroeder-Gardner – This course is a great introduction to blogging for profit. It covers topics such as choosing a niche, setting up your site, building traffic and selling products on your blog. It also shows you how to use Google AdSense ads and Amazon Associates affiliate links to help make money from your blog posts.
2. Blogger Income Blueprint by Darren Rowse – In this course Darren shows you how he makes over $50k per month from just 2 blogs! He shares his strategies for creating content that attracts visitors and then turning those visitors into subscribers and buyers of products that they find helpful or interesting on your website or email list (which is what leads him to making so much money).
Final Takes
I hope you enjoyed the guide above. It probably sounds pretty easy and straightforward, but unfortunately, like in any other business venture, success doesn’t happen overnight.
From there, you’ll want to choose the right platform for your business blog, though we only discussed how to start a blog using WordPress, There are other web platforms you can still use to get publish information through a blog design.
The SEO is an important part of making money online, but the work on the blog is different compared to other websites.
A successful business blog needs to look nice and have valuable content that will appeal to your audience.
There are numerous other factors that you need to consider when deciding whether this is a business idea for you or not:
Other Helpful resources on How to Create Good Blog Articles:
Best AI tools you can use to write blog content
Best Tools to and edit your content
Best graphics design tools for creating blog thumbnails and graphics.
Best Keyword Research tools for bloggers
Best SEO tools for Blogs
Best Plugins to manage affiliate links in blogs
Best Website to find stock images for blogger (Expand these topics )
Types of fonts to be using for your blog (sell adobe fonts)


