How to Activate SSL Certificate on a Domain in 2 Minutes

How to Activate SSL Certificate on a Domain | cPanel Tutorial

With cyber threats becoming increasingly sophisticated, it is important to protect sensitive information transmitted over the internet.

One of the best ways to ensure the security of your website and its visitors is by activating an SSL (Secure Sockets Layer) certificate.

The good news is, at Mashjoy Hosting and other secure web hosting companies. We make sure that all web hosting plans have a free lifetime Auto SSL that will work on all your hosted domains and subdomains.

However, activating SSL certificates can be confusing to some people.

Therefore, In this article, we will guide you through the process of activating an SSL certificate on a domain in just two minutes.

Jump to Actual Tutorial Steps↓

This website earns income through affiliate commissions, sponsorships, product sales, and Ads. However, Our opinions and evaluations about the products we write about are NOT influenced by our earnings. All product recommendations are our honest opinions, based on firsthand experience and extensive research. Read Our Full Affiliate Disclosure Here.
Table of Contents

What is an SSL Certificate?

Before we go into the steps of activating an SSL certificate on your website, 

Let’s first understand what an SSL certificate is and why it is essential for your website’s security. 

Take Me to Tutorial Steps↓

In simplest terms, an SSL certificate is that small secure-padlock sign that appears on the left side of the domain part of your website when it is loaded on the browser.

Without this, your browser will warn all your website visitors that your website is not secure and that it poses a risk that their personal data may be shared or stolen.

Inactive vs Active SSL Certificate on a website

Take Me to Tutorial Steps↓ 

Therefore, in technical terms, An SSL certificate is a digital certificate that encrypts the connection between a web browser and a web server.

It serves as a domain security trust indicator, assuring visitors that their data is secure and protected from interception by unauthorized parties. 

When an SSL certificate is activated on a website, it enables the HTTPS (HyperText Transfer Protocol Secure) protocol, which encrypts all data exchanged between the browser and the server.

This means, when visitors leave any sensitive information on your website such as personal data filled into a contact form and card details when shopping online, Their information cannot be accessed by any unauthorized third-party users or hackers.

If you need to know more about the ins and outs of what an SSL is, how it works, and so on, then read this detailed article here↗︎.

Steps Force Activate SSL on WordPress Websites

If you have built your website using WordPress and your host provides you a Free SSL certificate, then you just have to force activate the SSL on your WordPress site using the built-in cPanel tools.

To force the SSL on your website, first check by logging into cPanel if the SSL certificate provided by your host is, in fact, available and that it is activated on your domain. 

If the SSL certificate exists but is not activated, then activate it or force activate it by doing the following:

Step 1: Check if the Domain SSL Certificate is Available and Active.

Once logged in to cPanel, check for a small padlock symbol next to your domain name under the General Information section on the right panel of your cPanel dashboard.

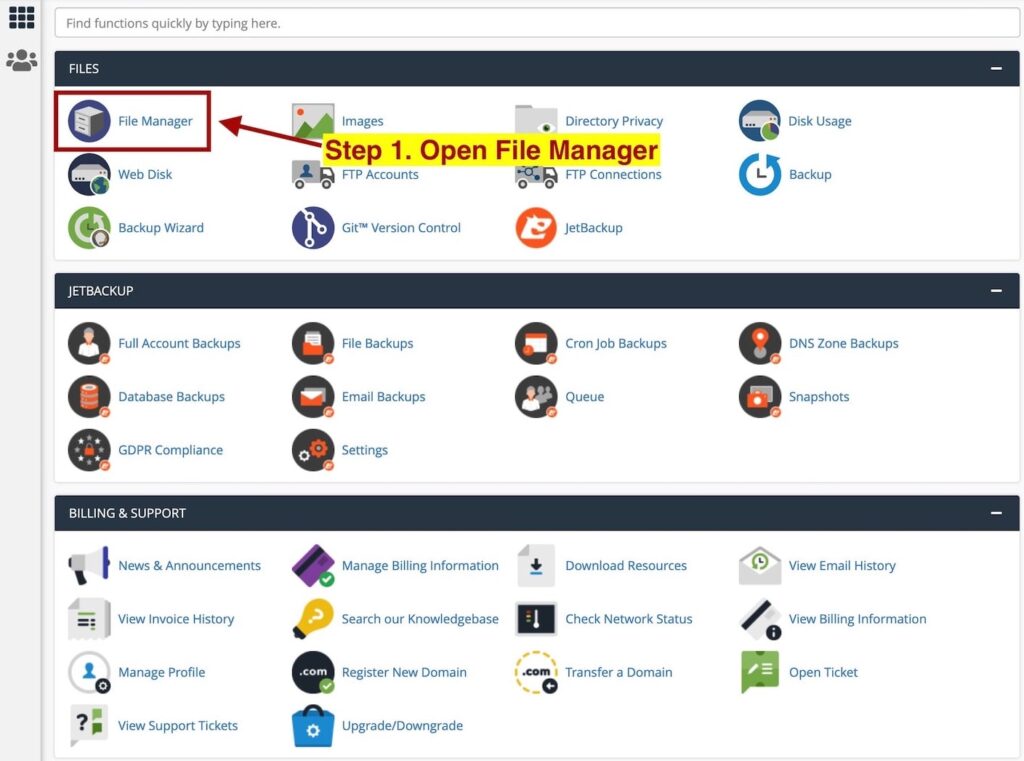
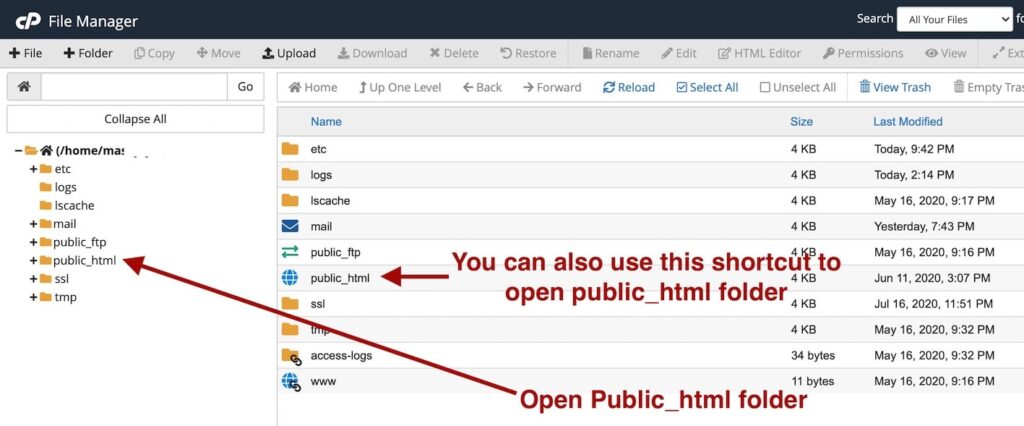
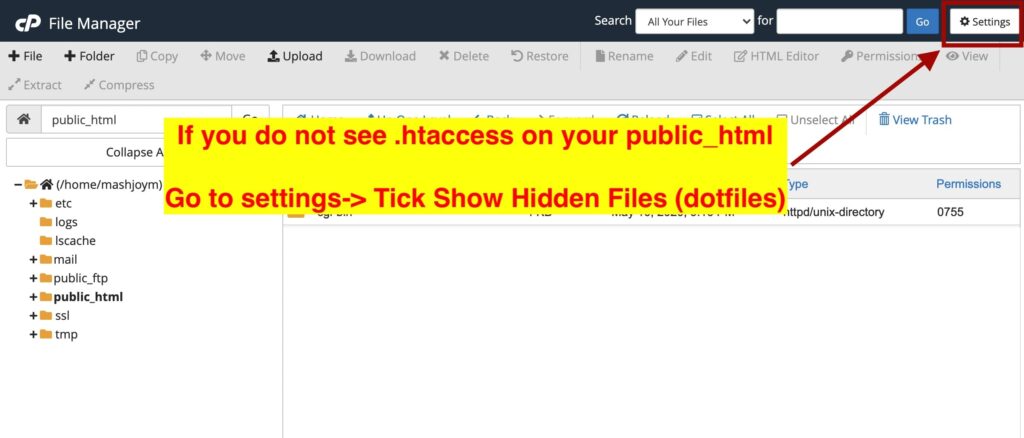
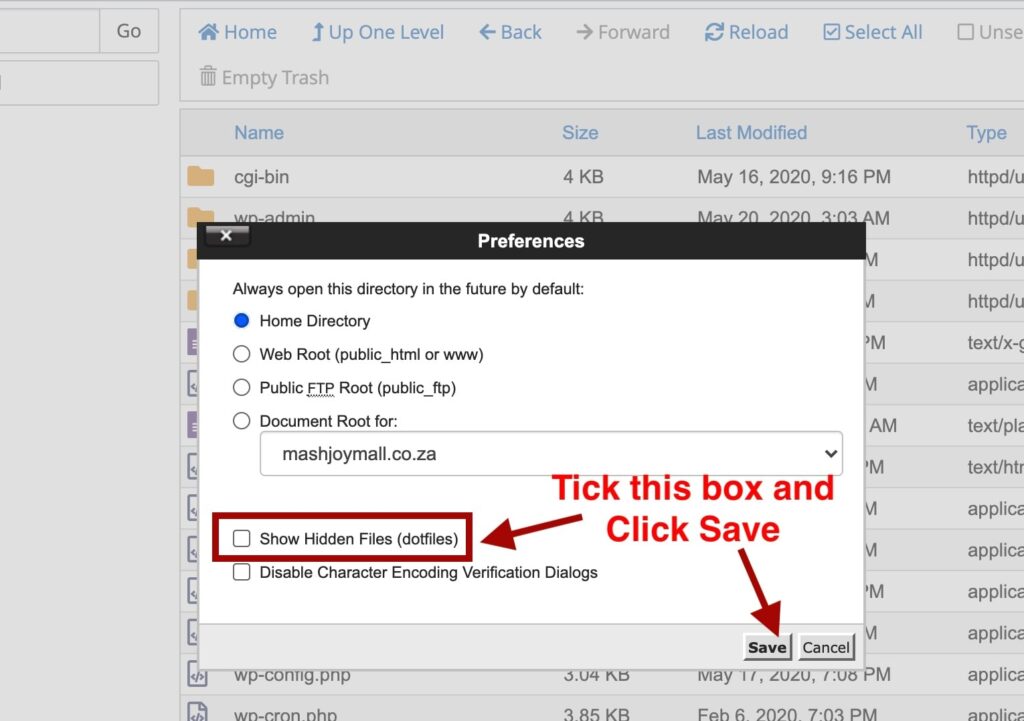
💡 Here's How to Login to cPanel using Mashjoy Hosting

👆🏼There are two ways you can login to cPanel on mashjoy.com:

Method 1: Login through your Client Account (Most Used Method)

Step 1: Log into mashjoy.com Client Area.

Visit, www.mashjoy.com and click Clients then Client Login.

If the arrangement of the website’s menu changes and you can’t find the Client Login Button. Use this link to signup: https://mashjoy.com/billing/clientarea.php

Step 2: Select Services.

Step 3: Choose the Hosting Account you'd like to Access via cPanel.

Choose by Clicking either the Name of the Hosting Package or the Price.

Step 4: Login to your cPanel Account

Method 2: Login Directly Through a cPanel URL

  1. Visit: https://yourdomainname/cpanel. e.g. If your domain name is luckypainters.com, then your cPanel URL will be https://luckypainters.com/cpanel.
  2. To prevent your browser from not allowing you to enter into a non-secure website. Always make sure you are using https (or http with an “s”) in front of the //yourdomain/cpanel part of the URL.
  3. With the correct cPanel URL entered to the browser, You’ll then be taken to a login page. Enter your username and password in the designated fields and click “Log In.”
  4. If you’ve entered your login credentials correctly, you’ll be taken to your cPanel dashboard. From here, you can access all of the tools and features available to you for managing your website.

Done!

That’s it! Logging in to your cPanel account is really that simple.

With just a few clicks, you’ll be able to access all of the tools and features you need to manage your website with ease.

So don’t waste any more time struggling to figure out how to login – follow these steps and you’ll be up and running in no time.

If you need any technical help regarding our web hosting services. Please let us know by opening a Support Ticket📧.

Other web hosts may have slightly different steps to log in to cPanel. But once logged in, the steps are very much similar. See below: ✅

How to Activate SSL on WordPress Website using cPanel 1
Step 2: Go to SSL/TLS Status

Search for “SSL” on the cPanel search bar and choose SSL/TLS status.

How to Activate SSL on WordPress Website using cPanel 3

Alternatively, locate the SSL/TLS Status tool by scrolling down to the Security section inside cPanel. 

How to Activate SSL on WordPress Website using cPanel 2
Step 3: Activate the SSL Certificate

Activate the SSL certificate by clicking Run Auto SSL. Make sure all your domains are included by also clicking Include [your number of domains] during Auto SSL.

It might take a couple of seconds or minutes to activate your SSL certificate. So just make sure you do not close the page while “Auto SSL is in Progress” is still running.

How to Activate SSL on WordPress Website using cPanel 4
Step 4: Done!

Once done, you will see confirmation messages in Green as well as indicators everywhere around all your domain properties.

If activating your SSL didn’t work as expected, you will see some error messages in Red. This is usually because the SSL in your domain needs to be re-assigned.

If this ever happens, I recommend contacting your web hosting support team for help in activating your domain SSL certificate.

If your SSL is activated by doing steps 1-4 but you still see no changes on your live website, then try the following: ✅

  1. Load your website in a completely new browser, or clear the cache in your current browser and reload.
  2. Install and activate a free WordPress plugin called Really Simple SSL. This plugin will automatically fix all the SSL errors between your WordPress website and the SSL on the server. If you need more from this plugin, consider going for the Pro Version.

Steps Force Activate SSL on All Types of Websites - Using Code.

Similarly, if you have built your website using HTML, PHP, or any external third-party website builder tool and had to manually upload your website files to cPanel,

You can force the SSL certificate on your domain by copying and pasting a simple piece of code to the .htaccess file in the home or root directory of your domain.

Here is how to do it:

Step 1: Login to cPanel
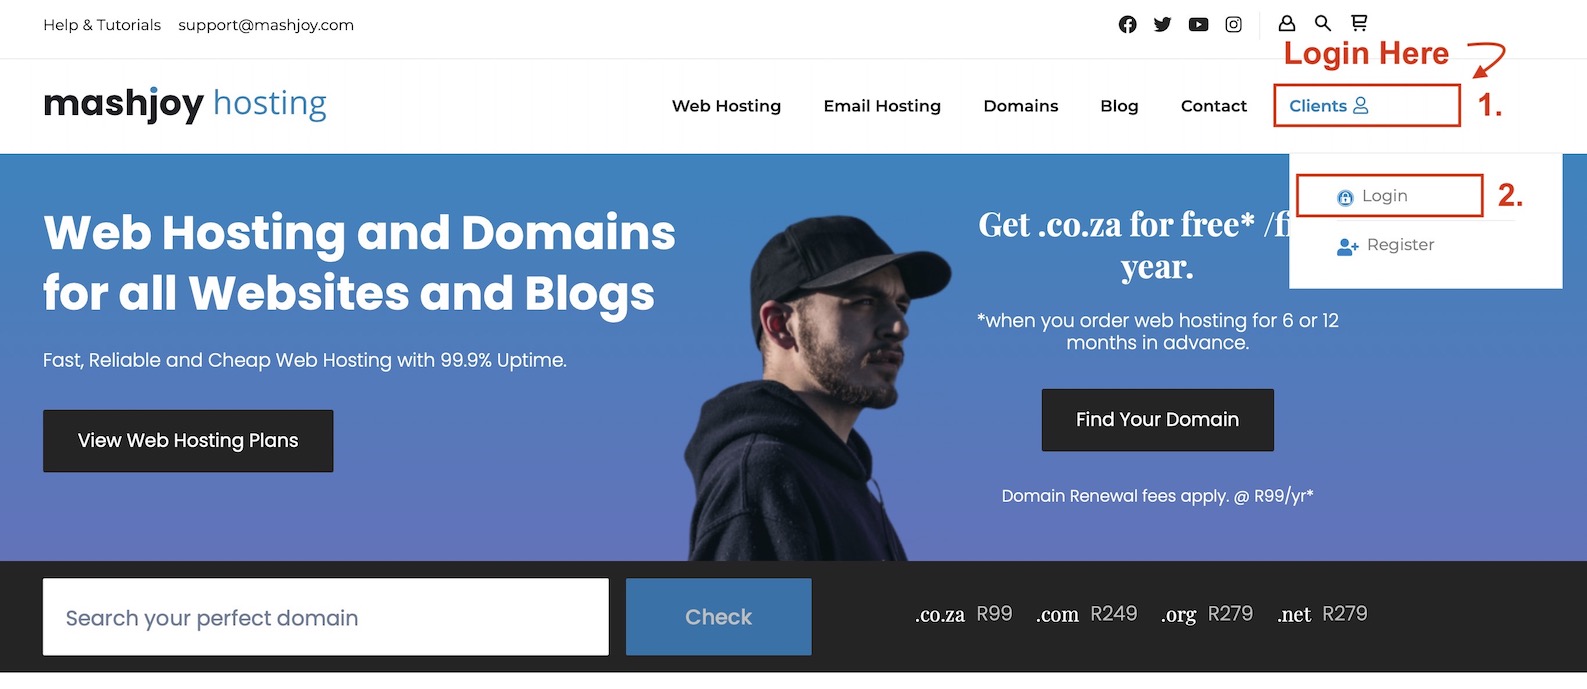
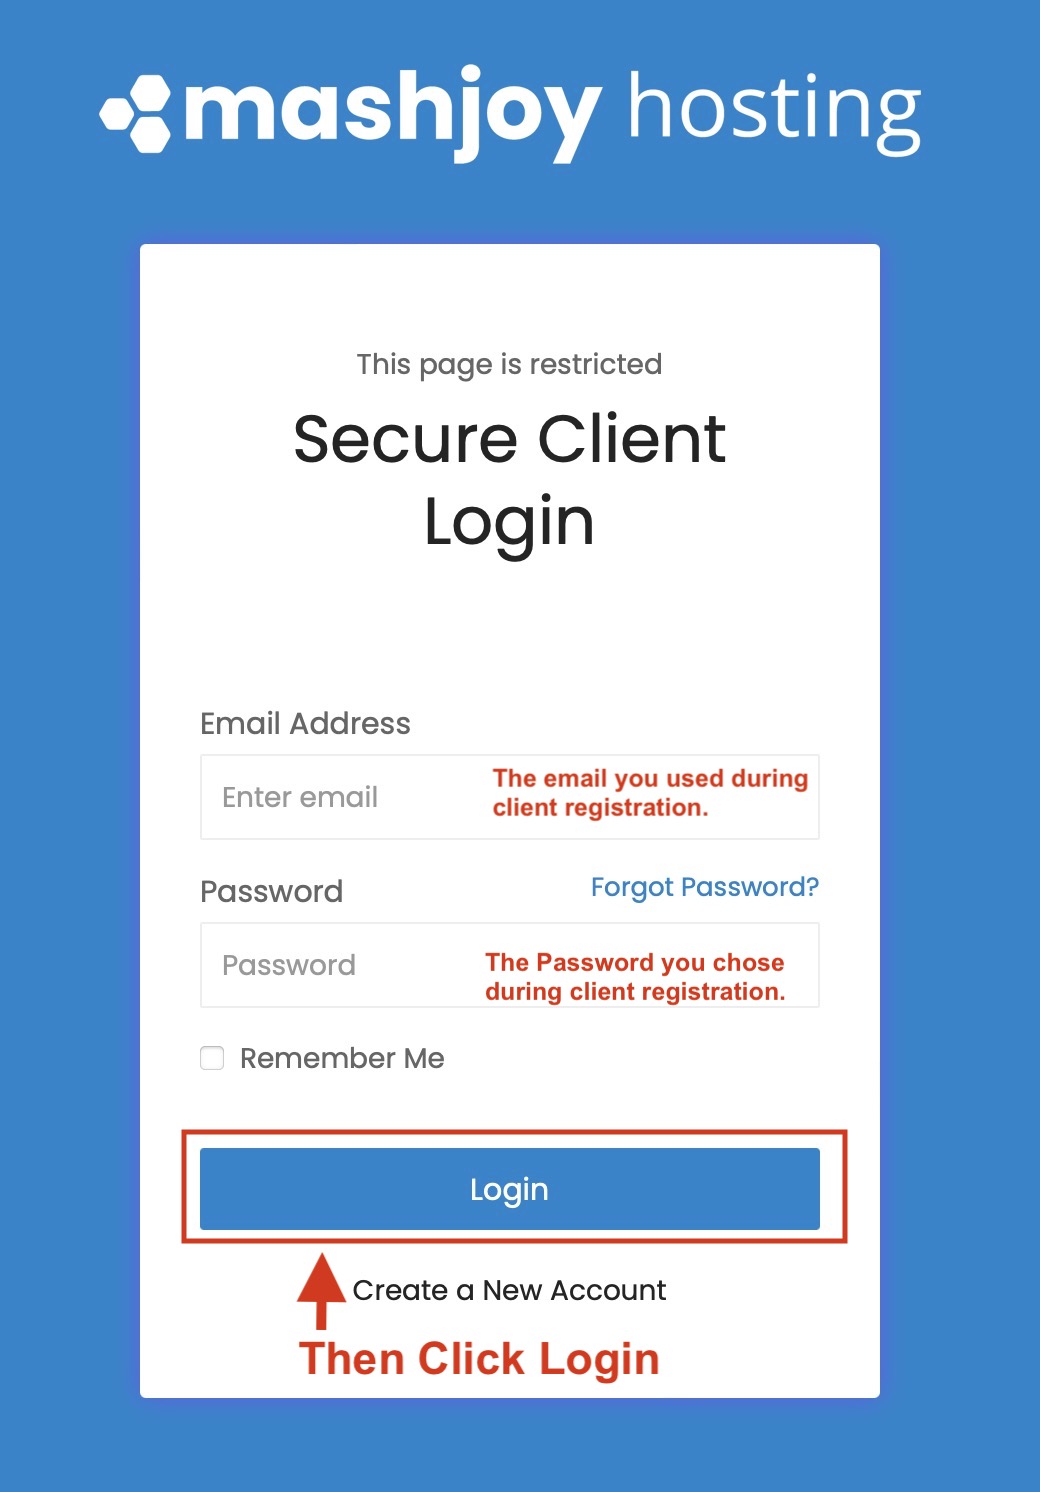
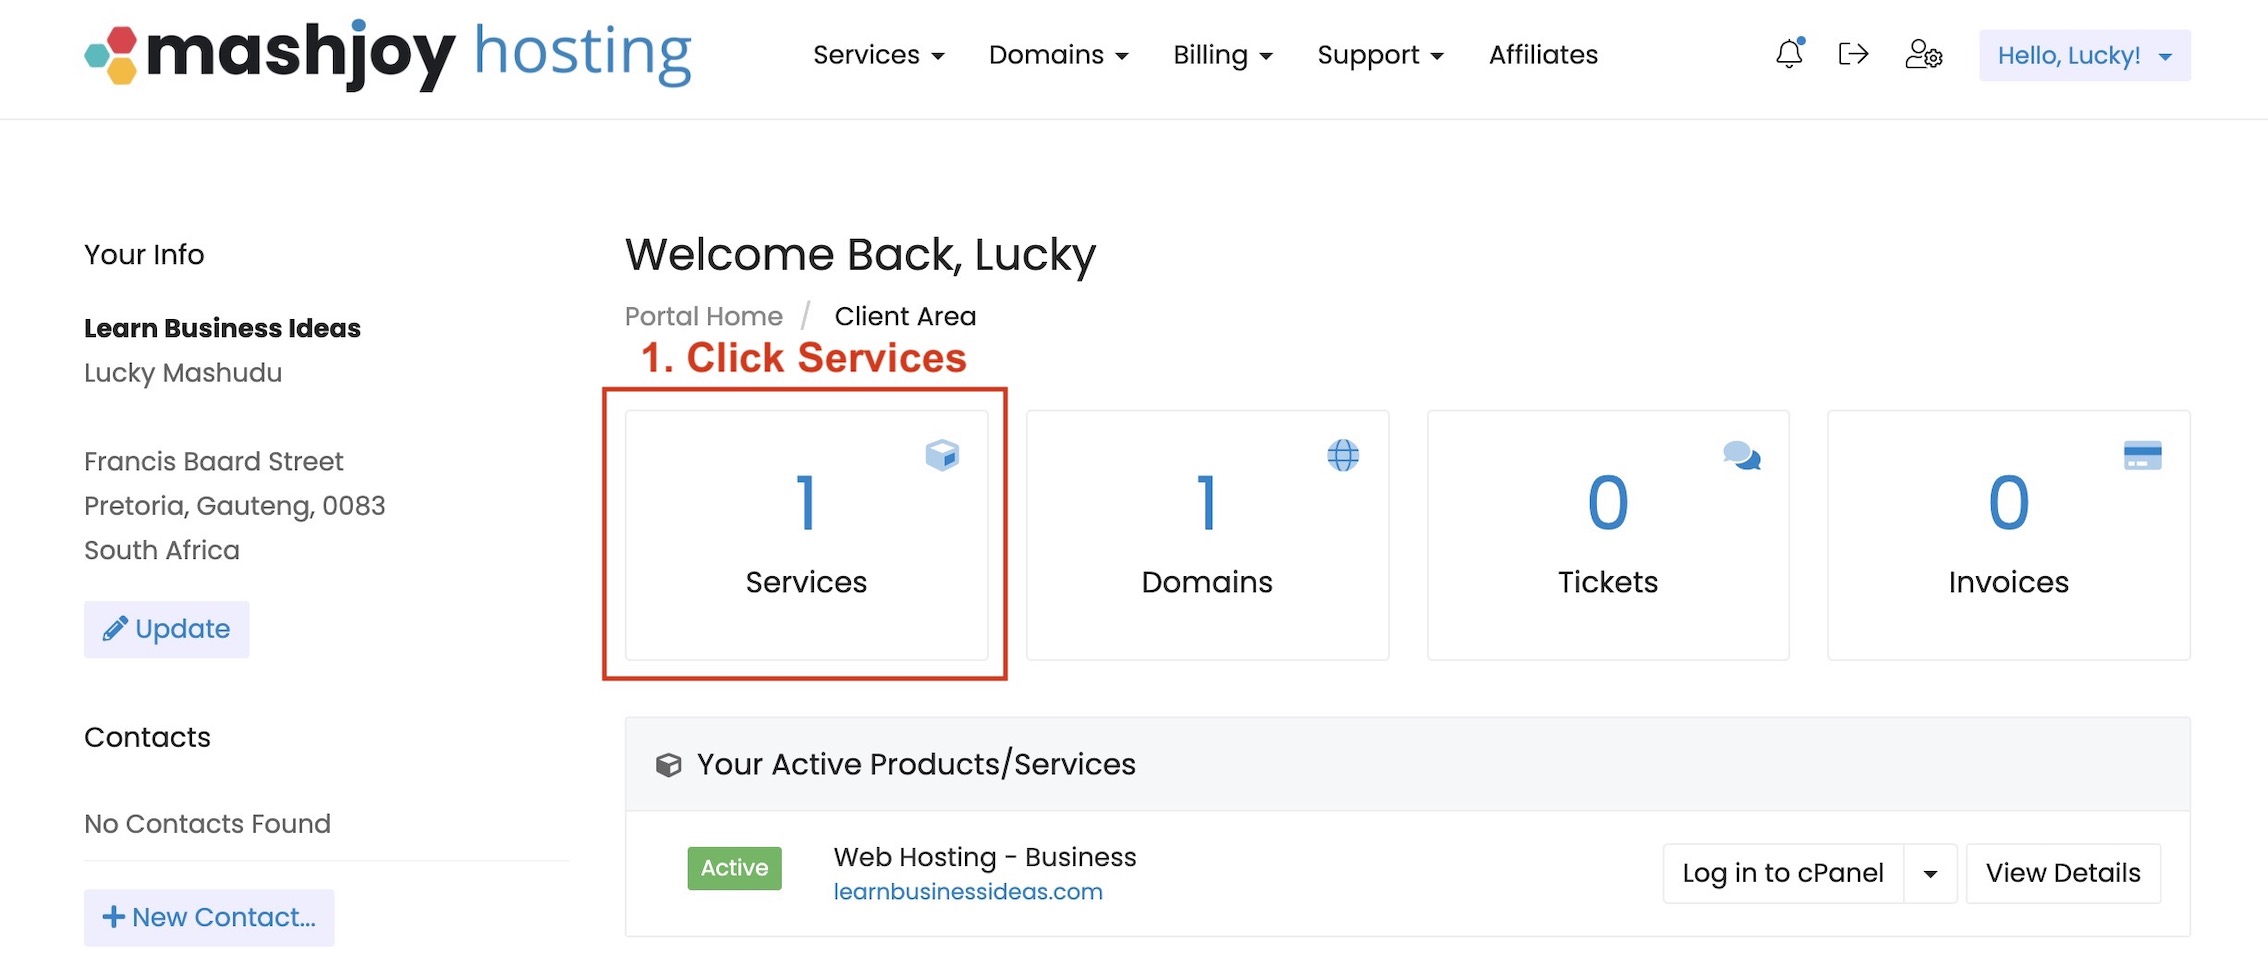
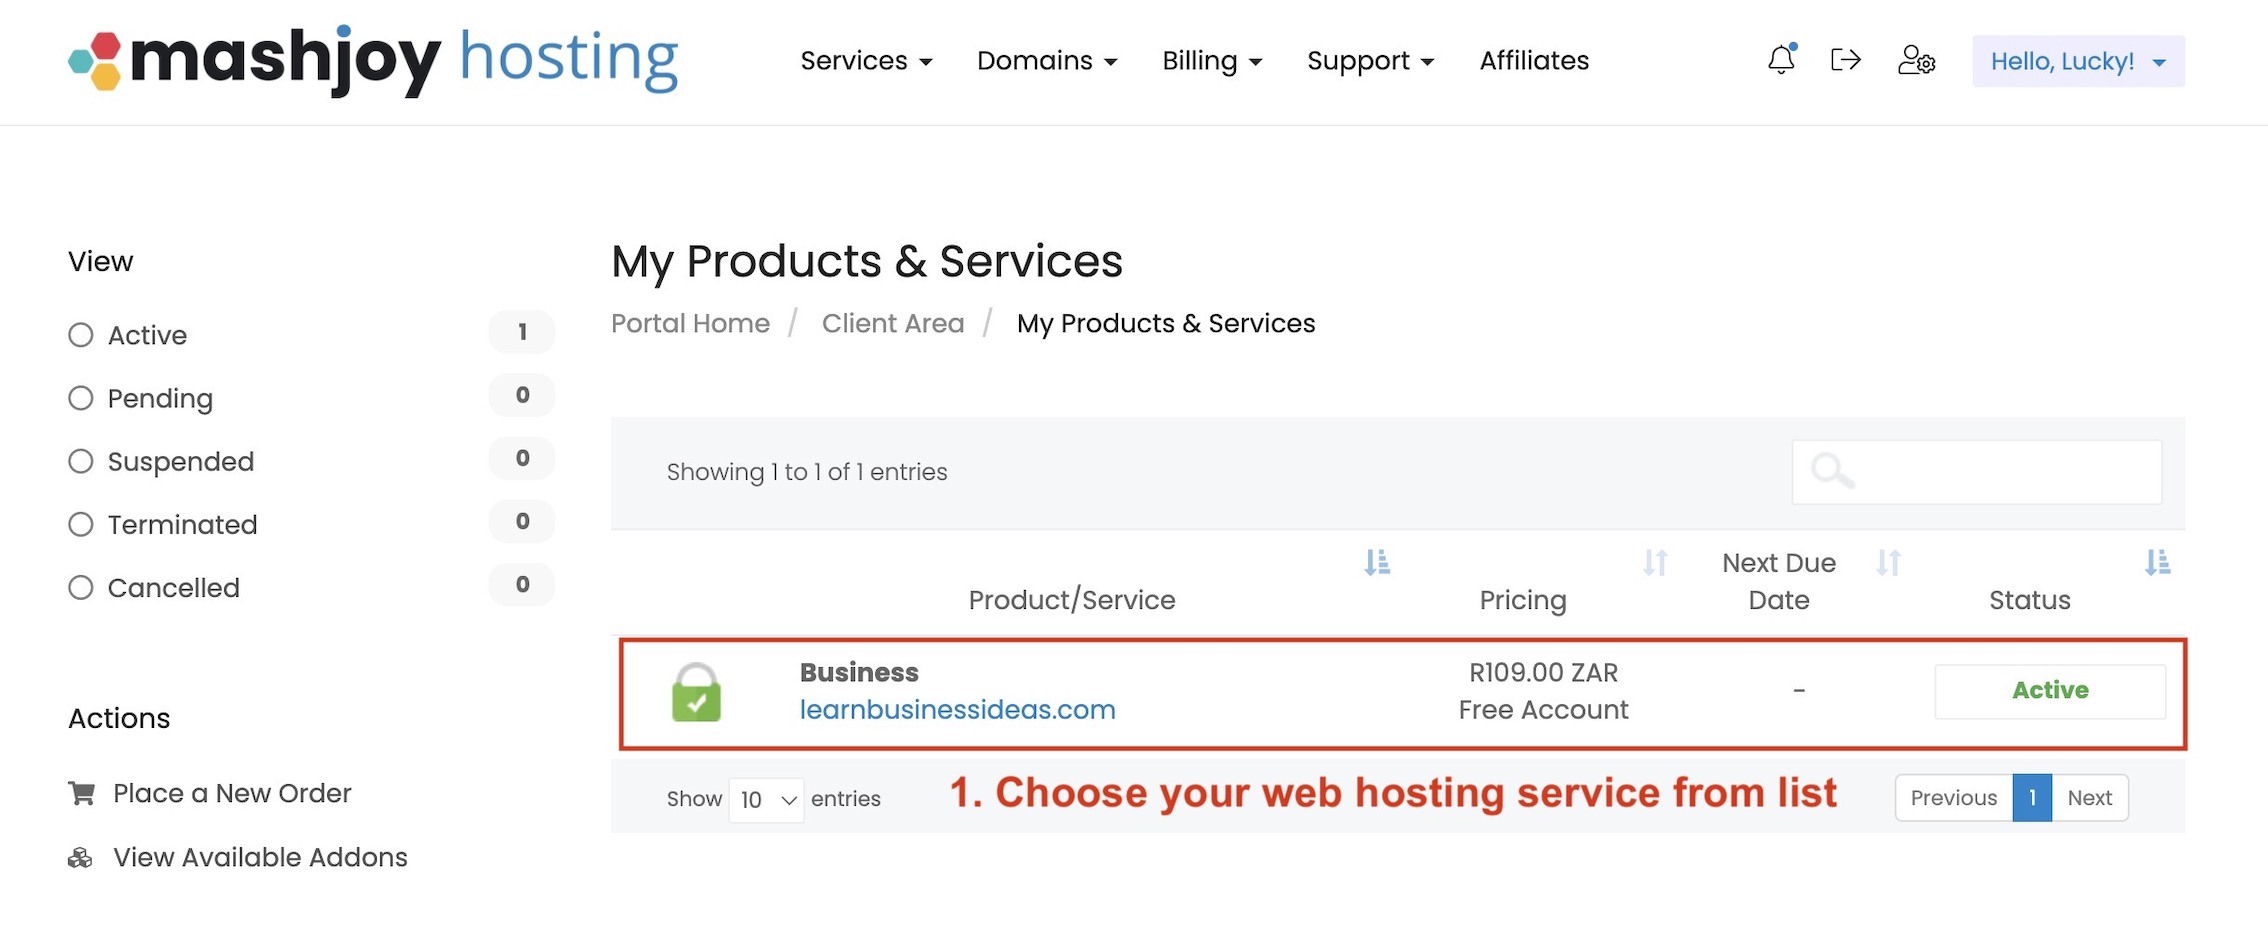
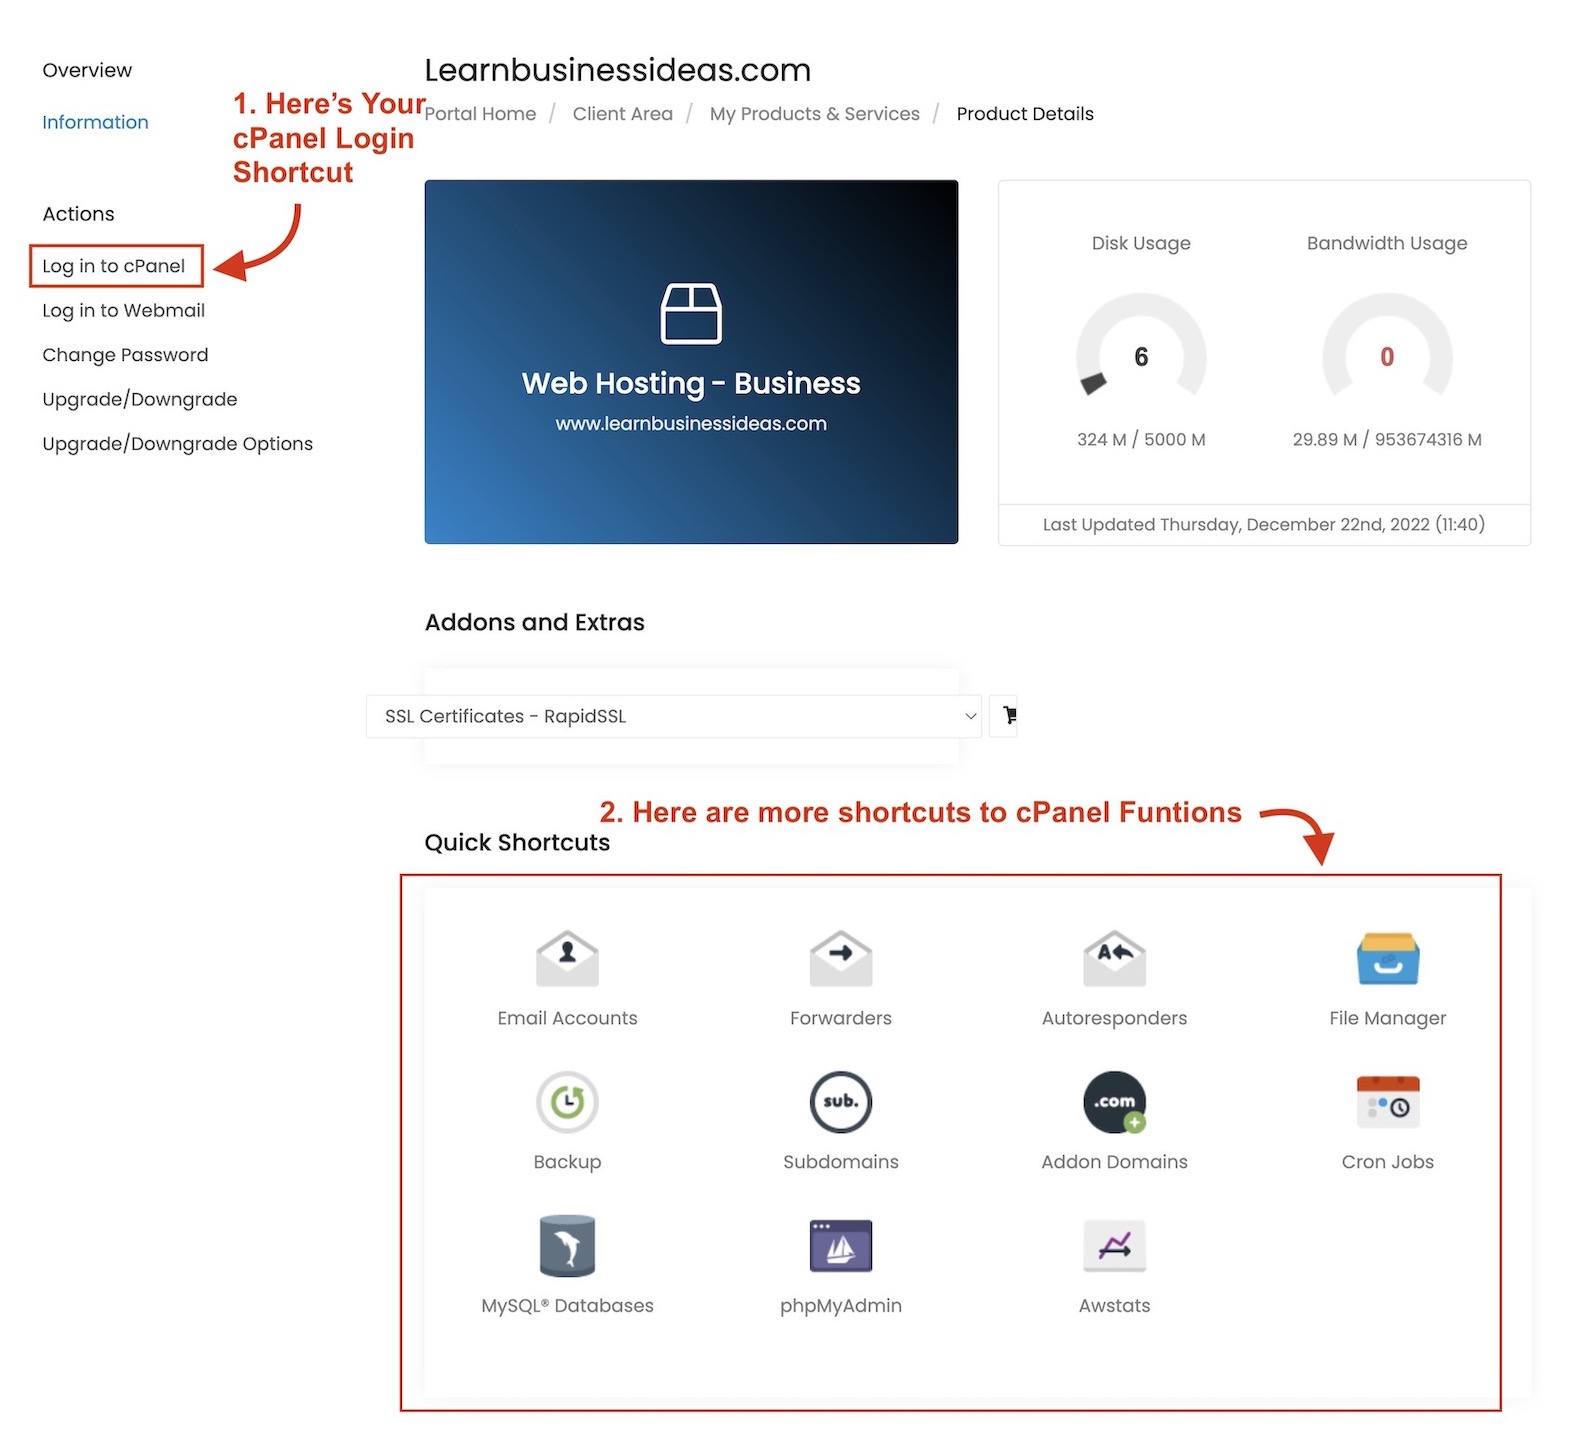
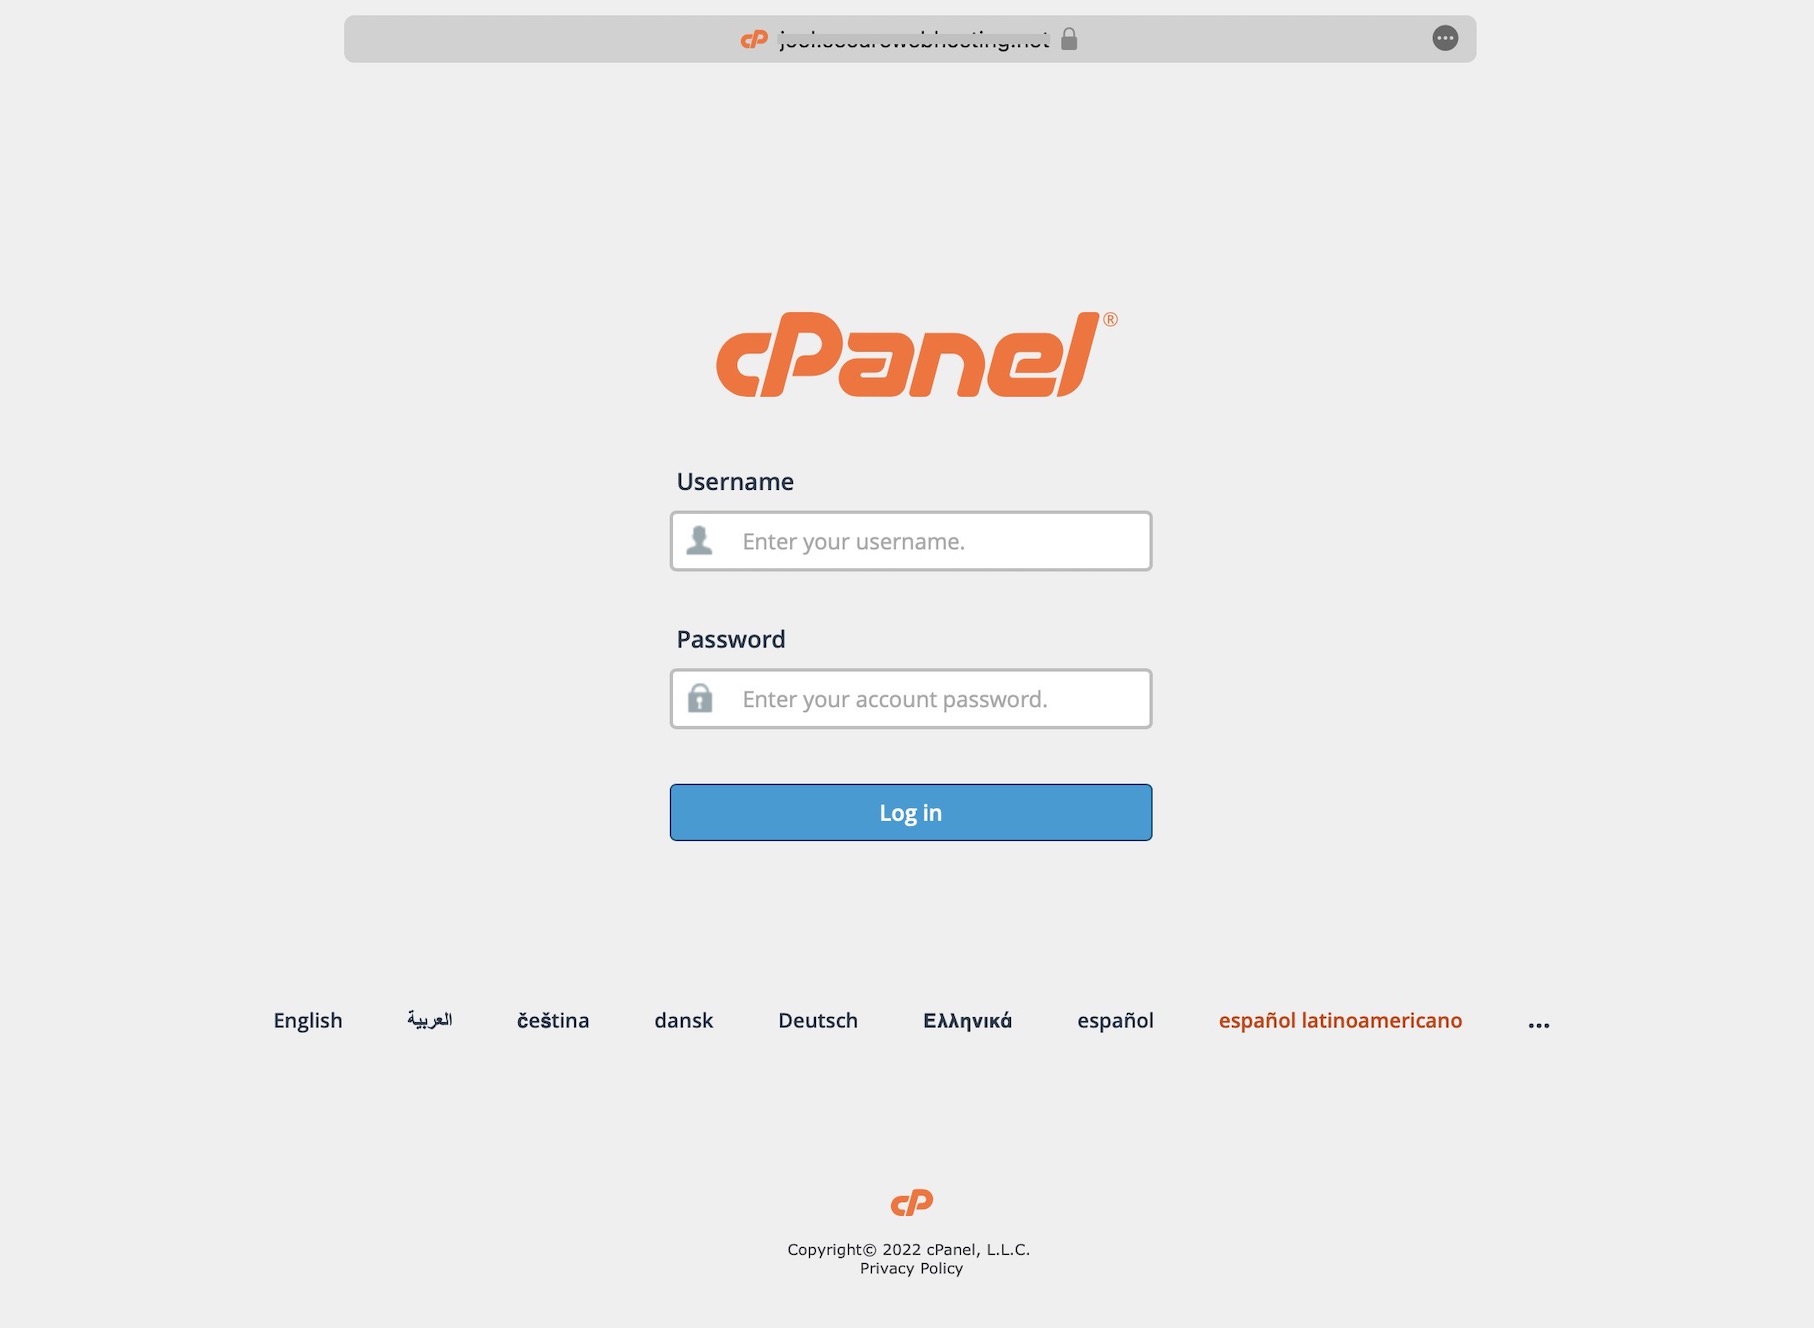
💡 Again, Here's How to Login to cPanel using Mashjoy Hosting

👆🏼There are two ways you can login to cPanel on mashjoy.com:

Method 1: Login through your Client Account (Most Used Method)

Step 1: Log into mashjoy.com Client Area.

Visit, www.mashjoy.com and click Clients then Client Login.

If the arrangement of the website’s menu changes and you can’t find the Client Login Button. Use this link to signup: https://mashjoy.com/billing/clientarea.php

Step 2: Select Services.

Step 3: Choose the Hosting Account you'd like to Access via cPanel.

Choose by Clicking either the Name of the Hosting Package or the Price.

Step 4: Login to your cPanel Account

Method 2: Login Directly Through a cPanel URL

  1. Visit: https://yourdomainname/cpanel. e.g. If your domain name is luckypainters.com, then your cPanel URL will be https://luckypainters.com/cpanel.
  2. To prevent your browser from not allowing you to enter into a non-secure website. Always make sure you are using https (or http with an “s”) in front of the //yourdomain/cpanel part of the URL.
  3. With the correct cPanel URL entered to the browser, You’ll then be taken to a login page. Enter your username and password in the designated fields and click “Log In.”
  4. If you’ve entered your login credentials correctly, you’ll be taken to your cPanel dashboard. From here, you can access all of the tools and features available to you for managing your website.

Done!

That’s it! Logging in to your cPanel account is really that simple.

With just a few clicks, you’ll be able to access all of the tools and features you need to manage your website with ease.

So don’t waste any more time struggling to figure out how to login – follow these steps and you’ll be up and running in no time.

If you need any technical help regarding our web hosting services. Please let us know by opening a Support Ticket📧.

Other web hosts may have slightly different steps to log in to cPanel. But once logged in, the steps are very much similar. See below: ✅

Step 2: Go to File Manager and open your public_html Folder

Search for “File Manager” on the cPanel search bar and choose File Manager

How to Activate SSL in cPanel 01
How to Activate SSL in cPanel 3
Step 3: Locate the .htaccess File

Locate the .htaccess file in your root directory folder. If you don’t see this file, try to unhide your files or add a new .htaccess file. Here’s how you do it:

Finding the .htaccess file by unhiding files.

How to Activate SSL in cPanel 9
How to Activate SSL in cPanel 4

If you still don’t see the .htaceess file after unhiding files, then just add a new .htaccess file.

How to Activate SSL in cPanel 5
How to Activate SSL in cPanel 6
Step 4: Paste the Code Force the SSL on Your Domain

After locating or creating a new .htaccess file.

Then simply copy this snippet of code and paste it into your .htaccess file. Once done, save changes and reload your website to see if the site loads with a secured SSL certificate.

Here is the code to be added: ✅

				
					RewriteEngine On 
RewriteCond %{HTTPS} !on 
RewriteCond %{REQUEST_URI} !^/[0-9]+\..+\.cpaneldcv$ 
RewriteCond %{REQUEST_URI} !^/\.well-known/pki-validation/[A-F0-9]{32}\.txt(?:\ Comodo\ DCV)?$ 
RewriteRule (.*) https://%{HTTP_HOST}%{REQUEST_URI} [L,R=301]
				
			
How to Activate SSL in cPanel 7
How to Activate SSL in cPanel 8
How to Activate SSL in cPanel 2
- End of Tutorial -

Conclusion

By following the step-by-step guide provided in this article,

I believe you can now easily activate an SSL certificate or HTTPS protocol on any of your domains without any issues.

If you are one of our hosting clients but still struggling with SSL, please let us know by ✉️ opening a Support Ticket.

In closing, activating an SSL certificate on your domain is a crucial step toward ensuring the security and trustworthiness of your website.

Making sure you have domain security, trust, and credibility through SSL certificate activation should be the first thing you do before publishing your website.

You might find these articles helpful:
Picture of Lucky Mashudu
Lucky Mashudu
Lucky is an editor, researcher, and product reviews expert at mashjoy.com. I publish helpful content mainly related to Online Marketing and Software As a Service (or SaaS)

Related Articles