

How to Create Email Accounts in cPanel
cPanel is a popular control panel for web hosting that makes it easy to manage your website and custom domain email accounts.
With cPanel, you can manage emails with features you’d get from email platforms like Office365, but for free in a website hosting plan.
If you need cPanel, first sign up with any of these cPanel Web Hosting Platforms, you will also get a free business domain when you create a hosting account with them.
Once you have setup a hosting account, you can easily log in to cPanel and create a new email account, set up email forwarding, and even create custom email filters.
So, let’s get started!
Step 1: Log in to your cPanel account
If you are using mashjoy.com as your host, Here’s how you log in to cPanel:
👆🏼There are two ways you can login to cPanel on mashjoy.com:
Method 1: Login through your Client Account (Most Used Method)
Step 1: Log into mashjoy.com Client Area.
Visit, www.mashjoy.com and click Clients then Client Login.
If the arrangement of the website’s menu changes and you can’t find the Client Login Button. Use this link to signup: https://mashjoy.com/billing/clientarea.php


Step 2: Select Services.

Step 3: Choose the Hosting Account you'd like to Access via cPanel.
Choose by Clicking either the Name of the Hosting Package or the Price.

Step 4: Login to your cPanel Account

Method 2: Login Directly Through a cPanel URL
- Visit: https://yourdomainname/cpanel. e.g. If your domain name is luckypainters.com, then your cPanel URL will be https://luckypainters.com/cpanel.
- To prevent your browser from not allowing you to enter into a non-secure website. Always make sure you are using https (or http with an “s”) in front of the //yourdomain/cpanel part of the URL.
- With the correct cPanel URL entered to the browser, You’ll then be taken to a login page. Enter your username and password in the designated fields and click “Log In.”
- If you’ve entered your login credentials correctly, you’ll be taken to your cPanel dashboard. From here, you can access all of the tools and features available to you for managing your website.

Done!
That’s it! Logging in to your cPanel account is really that simple.
With just a few clicks, you’ll be able to access all of the tools and features you need to manage your website with ease.
So don’t waste any more time struggling to figure out how to login – follow these steps and you’ll be up and running in no time.
If you need any technical help regarding our web hosting services. Please let us know by opening a Support Ticket📧.
If you are using any other host. The steps should be very much similar.
Another typical way for logging into your cPanel account is done by visiting yourdomain.com/cpanel. And use your cPanel login details as sent to you in the Welcome Email from your host.
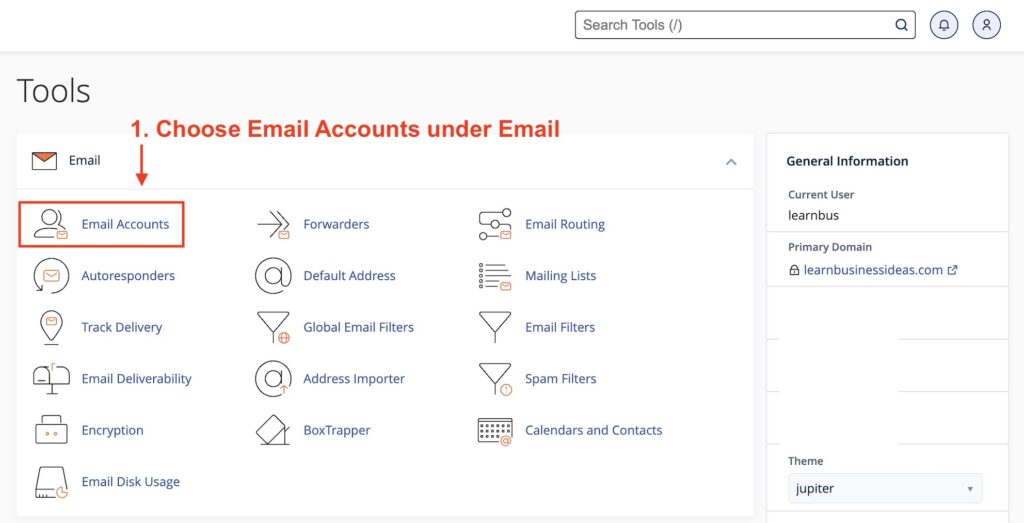
Step 2: Navigate to the Email Accounts section
On the cPanel dashboard, you’ll see a list of different options and tools. Look for the “Email” section, and click on the “Email Accounts” option.

Step 3: Create A New Account
On the far right of the Email Accounts screen. Locate the “+Create” button and Click it.

Step 4: Enter your email account information
On the Email Accounts page, you’ll see a form where you can enter your new email account information.
The form is quite straightforward, it’s really nothing new to what you’ve seen before.
First, choose a username for your new email account (e.g. john@yourdomain.com). Then, enter a password for your email account. You can also modify email disk quota limits per account.

Once you’ve entered all of your email account information, click the “Create” button. cPanel will create your new email account and you’ll see a confirmation message.
Connecting Emails to your Laptop/PC, Phone & Tablet
Once you have created your new email account. You will need to connect them to your other devices.
The steps are very simple. You simply copy & paste or download the email setup instructions and use them in the email setup stages of your device.
✅ Here’s how to do it:
Step 1: Login to cPanel
First, log into your cPanel account and click on the “Email Accounts” icon.
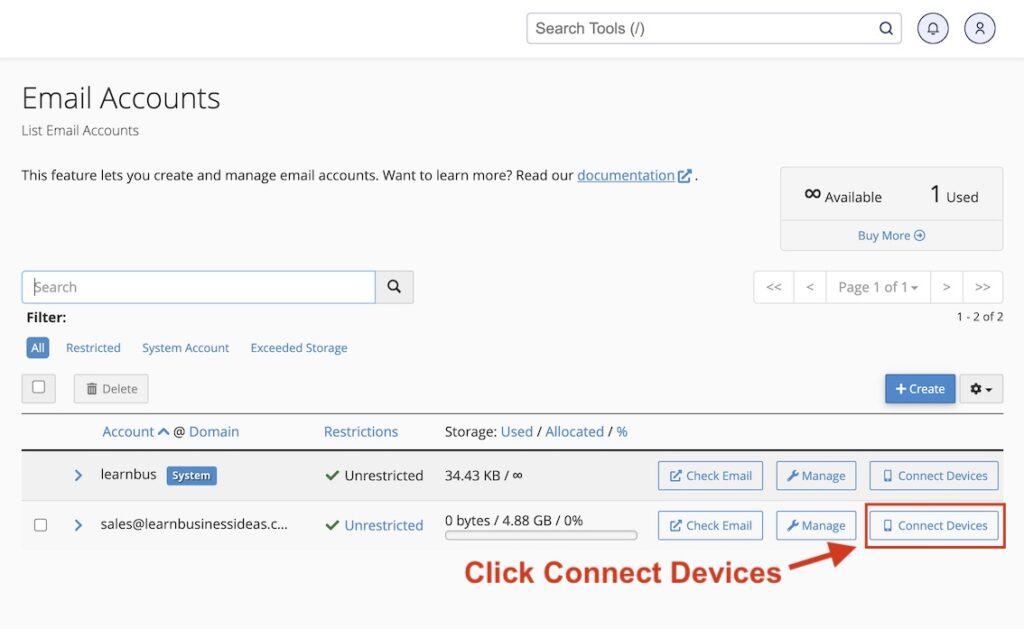
Step 2: Choose Email Account
Find the email account you want to connect and click on the “Connect Devices” button next to it.
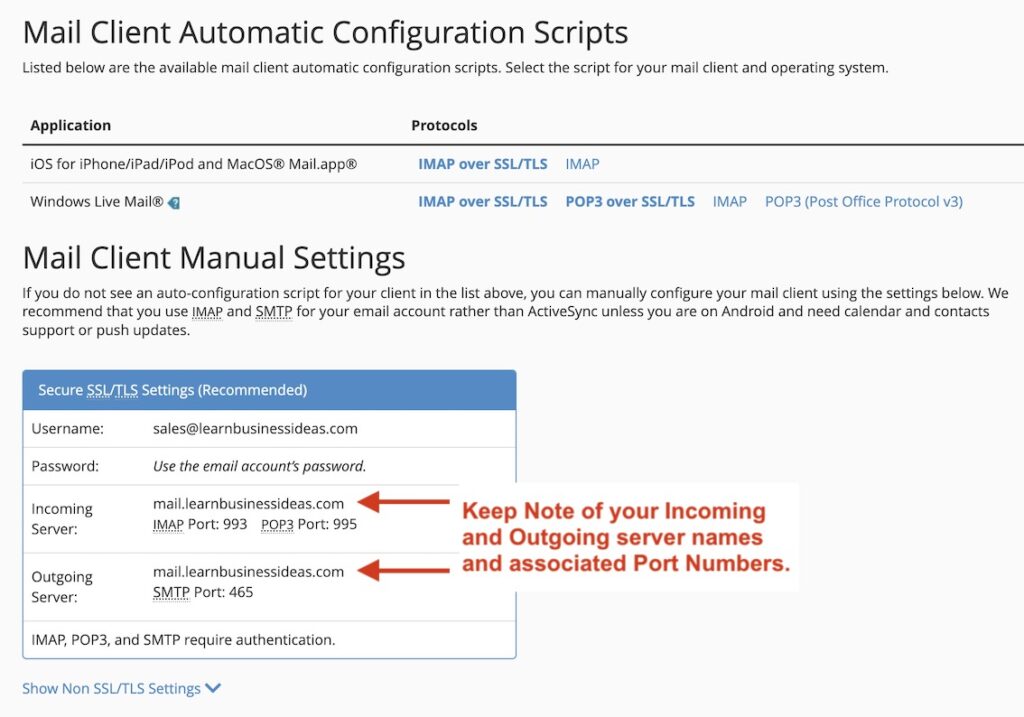
Step 3: Get Your Configuration Settings
A new window will open with the email setup instructions. Copy or download these instructions for use in the setup stages of your device.
The information you need here is what’s under Mail Client Manual Settings.
Any email App or software you are going to use will always ask for what’s on this type of screenshot.
If you are setting up multiple email accounts, 💡there is a way to easily remember these settings.
- Username – basically your email address.
- Password – The password you’ve set up for that email address.
- Incoming Server – The Incoming Server name will be the same for all email accounts in that specific domain name. It is always mail.yourdomainname.com or just add the prefix “mail.” then your domain name – (mail dot your domain name).
- Incoming Server Port Numbers – When setting up emails on any device, you will always be asked if you use IMAP or POP. Whichever you choose, Just keep in mind the IMAP Port number is 993 and POP3 is 995.
- 🙋🏽♂️ IMAP or POP3 – If you are unsure about the difference between IMAP and POP3, I’d recommend you just choose IMAP. IMAP behaves like any other email (@gmail, iCloud, @yahoo, etc.) and automatically syncs across all your devices and server in real-time. POP3 on the other side has its own pros and cons and may confuse some people, read here to understand the actual difference between IMAP & POP3.
- Outgoing Server – Works the same as incoming server. The only difference is the port numbers.
- Outgoing Server Port Numbers – Will be the same for all email accounts in that specific domain name. The Outgoing SMTP Port is always: 465 for IMAP and POP3.
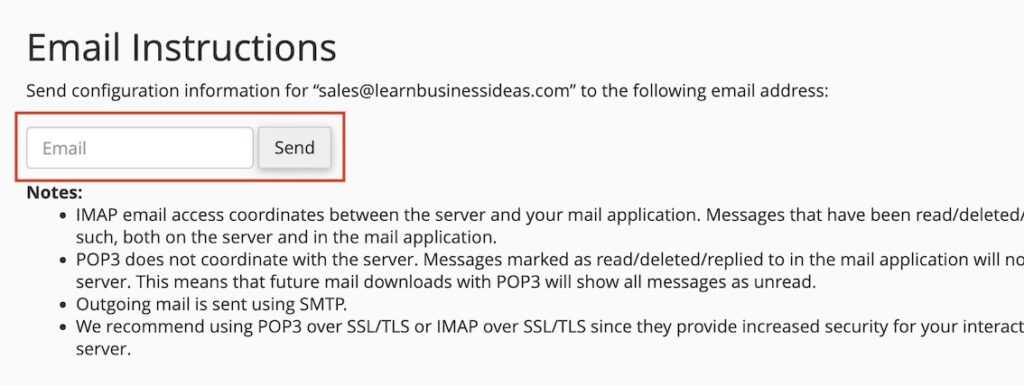
To avoid coming back to cPanel over and over again just for email account settings.
You can also download the copy email setup instructions to your existing email for ease of reference.
Device Instructions
The last step is to now use the instructions you copied or downloaded from your cPanel account to fill in the rest of the setup information, such as the incoming and outgoing server names and port numbers.
Depending on your device, go to settings, find email setup options, and follow the instructions to add a new email account.
Here are the email setup instructions for the most popular devices and mail client apps:👇🏽
Connect Emails to Laptop, PC and Mac Devices
Connect Emails to Smartphone & Tablet Devices
- How to Connect Emails to Android Phone / Tablet
- How to Connect Emails to iPhone and iPad
 End of Tutorial
And that’s it! You’ve just created a new email account in less than 2 minutes using cPanel.
With this new email account, you can send and receive emails, create custom filters, and even set up email forwarding.
So go ahead and start using your new email account today and take your communication skills to the next level.
If you’re one of our clients, let us know if you need any help by opening a support ticket.
If you are looking for an Email Hosting Platform, Checkout these Recommended Web Hosting Platforms or Use our Web Hosting Platform.
Thanks for reading and I hope this article was helpful!


